Removable Leather Handle Wrap for Cast-Iron Dutch Oven Bails
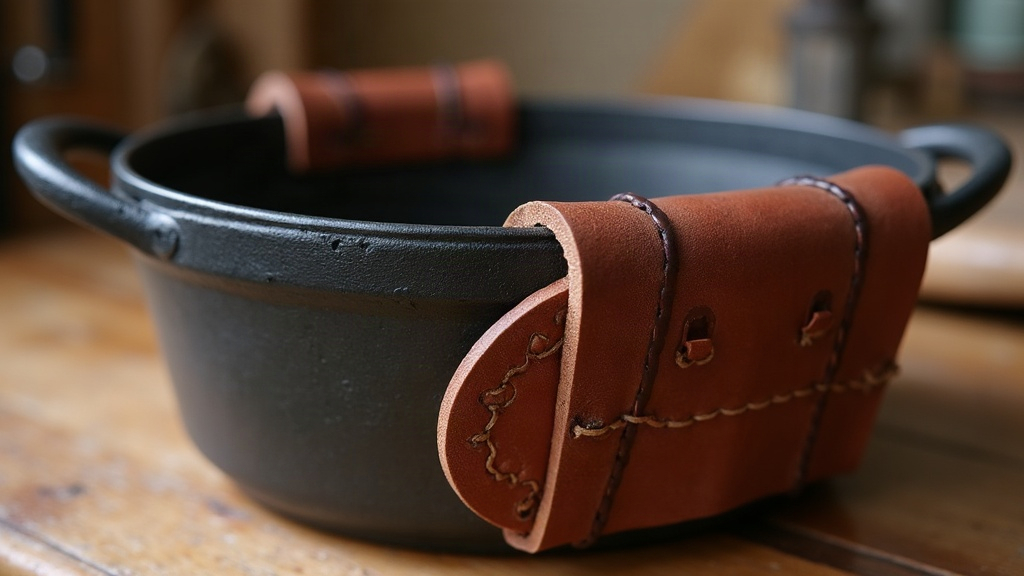
If you’ve ever grabbed a cast-iron Dutch oven bail handle with a bare hand, even for “just a second,” you know the regret hits fast. A removable leather handle wrap fixes that without permanently altering your pot, and honestly, it’s one of the more satisfying weekend leathercraft builds out there. Below I’ll walk through making a wrap that slides on and off without a fight, shrugs off campfire heat, and actually looks like something worth hanging in your kitchen or chuck box.
Why a Removable Wrap Beats a Fixed One
Most store-bought Dutch oven handle covers fall into two camps: permanently stitched tubes, or thin silicone sleeves that start melting the moment they get near open flame. A removable leather wrap sidesteps both problems, and it comes with a few real perks:
- Heat tolerance: 8-10 oz vegetable-tanned leather shrugs off brief contact with a hot bail. It won’t scorch or bubble the way synthetic covers tend to.
- Easy cleanup: Pull it off before seasoning the pot or tucking it away for storage, so moisture never gets trapped against bare iron. That trapped moisture is exactly what causes rust.
- Replaceable: Damaged or stretched out? Make a new one. No need to mess with hardware mounted on the pot itself.
- Multi-pot use: Size it a bit generously and one wrap can migrate between bail handles of similar diameter.
Materials You’ll Need
- 8-10 oz vegetable-tanned leather (a scrap about 10” x 5” covers one handle easily)
- Leather snaps or a buckle-and-strap closure (snaps go faster; buckles give you more adjustment room)
- Waxed thread and a stitching needle, or a rivet set if sewing isn’t your thing
- Edge beveler and burnisher (optional, but it’s what gives the edges that polished look)
- Leather conditioner or a beeswax-based sealant
- A rotary cutter or sharp utility knife, plus a cutting mat
- The bail handle itself (or a dowel matching its diameter) to use as a sizing mandrel
Step-by-Step: Building the Wrap
1. Measure the Bail Diameter and Length
Wrap a cloth tape measure around the thickest section of the bail, right where your hand naturally lands. Add roughly 1.5 inches to that circumference for overlap and closure room. Length-wise, 5 to 6 inches is the sweet spot, long enough to cover your entire palm.
2. Cut and Shape the Leather
Cut a rectangle to your measurements, then round off the corners slightly with a punch or knife so they don’t dig into your skin. Want something more contoured than a flat tube? Taper the piece narrower at the ends and leave it wider in the middle, right where your grip presses hardest.
3. Wet-Mold the Leather (Optional but Worth It)
This step is the difference between “decent” and “genuinely great.” Dampen the leather with water (don’t soak it), then wrap it snugly around the actual bail handle or a dowel of matching diameter. Let it sit and air-dry for a full 24 hours. The leather locks in that curved memory, which means it’ll slip on and off smoothly afterward instead of fighting the metal’s shape every time.
4. Add the Closure
For a snap closure: punch the holes, set the snap caps, and test the fit on the bail before you commit to final placement. Snaps are stubborn once they’re set, so get the position right the first time.
For a buckle-and-strap: stitch a short strap with 2-3 adjustment holes on one end, buckle on the other. This version forgives a little more if your pot’s handle runs slightly oversized.
5. Finish the Edges
Bevel the raw edges, dampen them lightly, then burnish with a wooden slicker or canvas cloth until they turn smooth and slightly glossy. This one step alone is what makes a homemade piece look store-bought.
6. Condition and Seal
Rub in a thin coat of leather conditioner or beeswax balm. It guards against moisture and the occasional scorch, and over time it deepens the color into a nice patina, the kind that only comes from actual use.
Fit-Testing Tips
- It should slide on with a bit of resistance, never requiring real force.
- Test it hot: heat the bail carefully (gloves on) to mimic a campfire scenario, and check that the leather doesn’t transfer uncomfortable warmth to your palm.
- Too loose after molding? Glue a thin strip of leather to the inside at the midpoint. That tightens the fit without starting over on the whole piece.
Maintenance
Take the wrap off whenever you’re seasoning the oven or putting it away long-term. Leather sitting against bare cast iron for extended periods traps humidity, and that’s a direct invitation for rust. Store the wrap flat, or loosely curled, out of direct sunlight, and recondition it every couple of months if it’s seeing regular campfire duty.
Final Thoughts
A removable leather handle wrap is a small project that punches way above its weight: better grip, fewer scorched palms, and a handmade piece that only looks better the more trips it survives. Once you’ve made your first one, a second wrap takes under an hour, which makes it a solid gift to pair with a cast-iron pot, or a nice way to round out a whole camp cookware setup.